
Two tools to help you get consistent results.
Most of my work is focused on building intuition through repetition and experience. However, I often pick a few measuring techniques as guides to increase the chance that I make the right connections. It speeds up my process by giving objective data points to correlate to my experience and helps me reduce the number of rejected parts, especially when I am developing new techniques. For bending with Blue Bend, I rely on the following two tools to get consistent results.

Shore D Hardness tester:
Successful bending mediums strike a balance between being hard enough to hold tube roundness, but flexible enough to bend and even break when necessary to give the material space to move. Blue Bend hardens slowly and moves through different phases of hardness which you can use to your advantage.
Shore hardness testers work for hard rubbers and plastics and use a pointed intender to measure the depth of penetration into a material. The D scale uses a sharper tip than the A scale and will give a more sensitive reading although it takes a few extra seconds for the dial to settle.
Pour half an inch of Blue Bend into a silicone muffin mold when the Blue Bend is poured into the tube. A bowl lined with parchment paper would work as well. Throughout the cooling and hardening phase, use the Shore D tester to get a sense of how quickly it sets up and make a note of the value just before bending.
With this method, a Shore number can be correlated a with a bending experience. That is useful data for modifying waiting times to find the right balance between hardness and flexibility for any particular bend. Since the focus is on the correlations, the exact numbers don’t matter and an inexpensive tester works just fine.
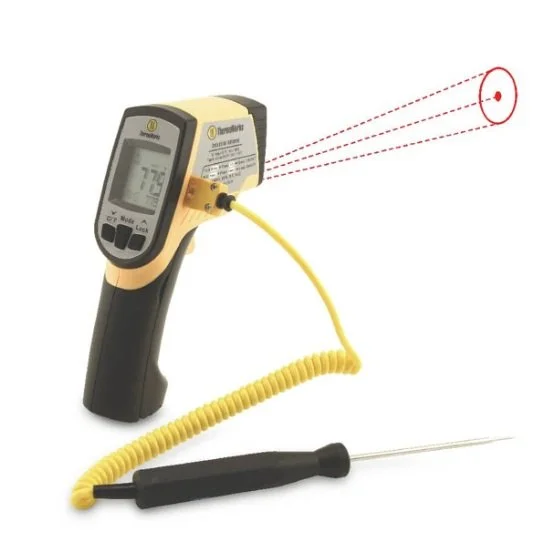
Thermometer:
Blue Bend melts at a high temperature relative to other bending mediums which means that Blue Bend performs consistently at a variety of ambient room temperatures. Pitch, for example, melts around 240F but has an optimum ambient temperature bending range that is quite small (68-70F). Blue Bend has shown good results in all ambient conditions, due in part to its high melting temperature.
That said, overheating is the most common reason that Blue Bend gives poor results. The optimal pouring temperature is around 300F-310F, and Blue Bend seems to be stable heated all the way up to 350F (which I would recommend avoiding). Above 350, things begin to change and by 380F, the Blue Bend will not harden anymore and will cool into a sticky mess and offer no support to the tube during bending. At this point, the batch is ruined and should be discarded. So, while the temperature range is somewhat forgiving, monitoring the temperature with a good quality thermometer will help keep Blue Bend inside the optimal melting ranges and preserve it as long as possible.
My preferred thermometer is a Thermoworks infrared thermometer (not an ad or affiliate link, it’s just what I use and I like it). Infrared thermometers are the fastest and safest way to monitor Blue Bend, but they struggle with measuring liquids or other materials that don’t radiate heat in the same ways as solid bodies. My thermometer shows consistently 10-15 degrees (F) cooler with the IR sensor than with the probe. Knowing that, I simply mentally subtract about 10 degrees from the reading and have had good success with pouring at the right consistency without risking overheating.
Testing and experimentation is the best way to use Blue Bend and choosing a few objective data points to record will help you reach your goals faster and with fewer failed attempts. A Shore D hardness tester can help you know when to bend your parts and a good quality thermometer can help ensure that you’re pouring at the same temperature and avoiding overheating. As always, feel free to reach out if you need help!